Learning path: Internals and operations. View the suggested reading order. This reference includes release-specific examples; check the version context before applying a technique.
This guide collects the material on this site about how Teradata behaves underneath the SQL — what the database does when it is under pressure, how it protects and isolates data, and the operational details that only matter until the day they matter a great deal.
Workload Flow Control and DBC.ResUsage
The DBC.ResUsageSAWT table serves as our main tool for analyzing workload flow control states. To provide an overview, we will outline the main characteristics of this table.
The table displays several measures that reflect the state at the conclusion of a 10-minute interval. It’s important to note that the allotted interval may diverge from that of your system if the database administrator altered it. The “secs” column specifies the predetermined duration of the interval in seconds. In our instance, it spans 600 seconds (i.e., 10 minutes).
Each row in the data represents a specific Date and Time, occurring every 10 minutes, along with the corresponding Node and AMP information.
Allow me to provide a brief overview of the vital columns and their contents:
TheDate: The snapshot date.
TheTime: Represents the time when the snapshot was taken.
TheDate and TheTime display the status of AMP worker tasks at the end of each 10-minute interval.
Secs: Defines the duration of a snapshot interval
VPRID: Identifies the AMP
MailBoxDepth: This shows the number of messages in the AMP queue at the end of the snapshot interval.
If no AMP worker task is available to take over additional work, the task will be queued and appear in MailBoxDepth.
FlowControlled: This shows if the AMP is in a flow control state at the end of the snapshot interval.
FlowCtlCnt: This shows the number of times the AMP entered the flow control state during the snapshot interval.
InUseMax: This shows the maximum number of AMP worker tasks that have been active simultaneously during the snapshot interval.
Available: This shows the number of free AMP worker tasks at the end of the snapshot interval.
AvailableMin: Shows the minimum number of free AMP worker tasks during the snapshot interval.
AWTLimit: This shows the number of total AWTs in the system.
WorkTypeMax00, …, WorkTypeMax15: Shows the maximum number of AMP worker tasks per work type during the snapshot interval.
I renamed the columns to better understand the type of workload each column presents.
Although a few extra columns exist, they are typically irrelevant to our objective.
Certain columns displayed are exclusive to Teradata 14.10 or newer versions, and their population may differ prior to version 14.10.
Our test scenario involves analyzing the most severe flow control situation within DBC.ResUsageSAWT. Specifically, we will closely examine the AMP that experienced the lengthiest duration of flow control on a given day.
Our test scenario involves analyzing the most
/* Historical query omitted: the referenced AWTLimit/CollectIntervals columns are unavailable in this view on Teradata Database 20.00.28.81. Inspect release-specific ResUsage columns and units before defining a report. */
It is impossible to summarize WorkTypeMax00 to WorkTypeMax15 as the maximum numbers are gathered independently in each logging interval. While these columns can be utilized to analyze the behavior of a specific workload type, such as abort steps, they cannot accurately represent the overall system load.
InUseMax describes an individual AMP’s peak observed AWT usage in the interval. Interpret it with that AMP’s applicable limits and worker pools, along with waiting-work metrics; it is not by itself a measure of total system load.
In addition to the measure InUseMax, which only displays the top usage of AMP worker tasks, we have two supplementary measures, Available and AvailableMin, that provide a more comprehensive overview.
Both measures can analyze events throughout and at the conclusion of the snapshot period.
“Available” indicates the quantity of unutilized AMP worker tasks following the snapshot interval. If “Available” remains at 0 for a series of successive snapshots, it indicates that your system has exhausted its AMP worker task supply over an extended period.
The column “AvailableMin” provides further information, indicating the minimum number of available AMP worker tasks within the snapshot interval.
The column “AvailableMin” provides further
Zero availability in consecutive snapshots shows exhaustion at those observations, not uninterrupted exhaustion between them. Keep per-AMP scope explicit: AWTLimit is per AMP. For daily peaks group by date; independent maxima are not simultaneous peaks, and FlowControlled state differs from FlowCtlCnt entry counts.
High usage of AWT does not automatically indicate the system is in flow control. The system enters a flow control state when all AMP worker tasks are occupied and the message queues are full. Although the mailbox depth is generally above zero during a flow control state, it is not always accurate because it only displays the message queue size at the conclusion of each snapshot interval. It is possible that the AMP was in a flow control state during the snapshot interval, but the queue was empty by the end. This should be considered.
FlowControlled indicates the AMP’s flow control status at the end of a snapshot interval but does not necessarily reflect its status throughout the interval. Thus, relying solely on this measure can be misleading.
FlowCtlCnt indicates how often the AMP entered the flow control state during the snapshot interval.
FlowCtlTime is the total time the AMP was in flow control during the snapshot interval (in milliseconds)
Read these metrics per AMP and snapshot interval. Summing InUseMax values from different AMPs adds independently timed peaks; it does not establish a simultaneous system-wide peak. Correlate aligned observations, waiting work, and workload activity before diagnosing saturation.
Combining the aforementioned metrics will provide
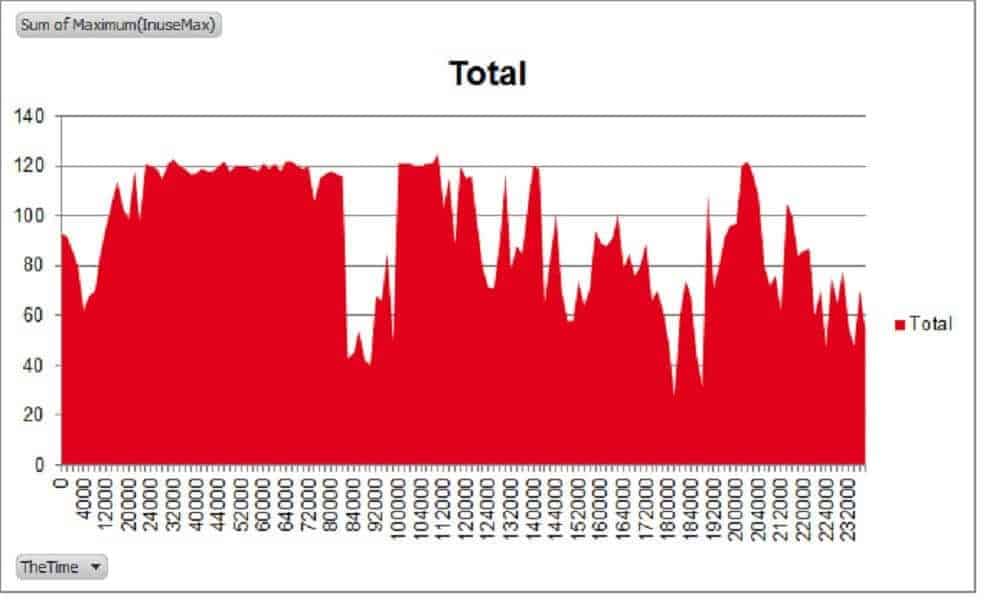
Historical AWT values such as 80 or 120 are release- and configuration-specific. Inspect the current per-AMP limit and bottleneck before considering a change.
Flow control starts with the worker tasks themselves: what an AMP worker task is and what happens when they run out.
Write Ahead Logic (WAL)
Accessing data has always been the bottleneck of database systems. Once the data resides in the main memory, it can be promptly processed.
Although SSDs are now predominantly used instead of hard disks, copying data into the main memory remains the slowest operation.
The Teradata Write-Ahead Logging (WAL) feature enhances DML performance and boosts data security.
Get the complete Teradata tuning book, free
Teradata Query Performance Tuning: The DWHPro Guide
By Roland Wenzlofsky & Artemios Vogiatzis
206 pages on statistics and demographics, access paths and indexes, query execution plans, and joins. Get the full PDF and practical Teradata updates from DWHPro.
Confirm your email to receive your download link. Privacy policy. Unsubscribe in any newsletter.
About the free bookWhat is the Teradata Write-Ahead Logging (WAL)?
The Teradata WAL increases DML statements’ reliability and ensures that Teradata can recover changes during errors. The WAL also improves the performance of DML statements.
How does the Teradata WAL work?
When a DML statement is executed, Teradata copies the affected data blocks from the disk into the main memory.
A copy of the rows to be changed is stored in the WAL log.
The data block is changed in the main memory and marked as modified but not written back to the disk.
The changed rows are written in the WAL log.
Transaction locks follow the transaction boundary; completing one DML statement does not release its locks while an explicit transaction remains open. Other sessions can modify compatible rows only when the applicable locks permit it; a cached block does not bypass transaction isolation.
Later, the data block is finally written back to the disk. This is done in the background.
If the data block’s size has not changed, it is written back to the same place.
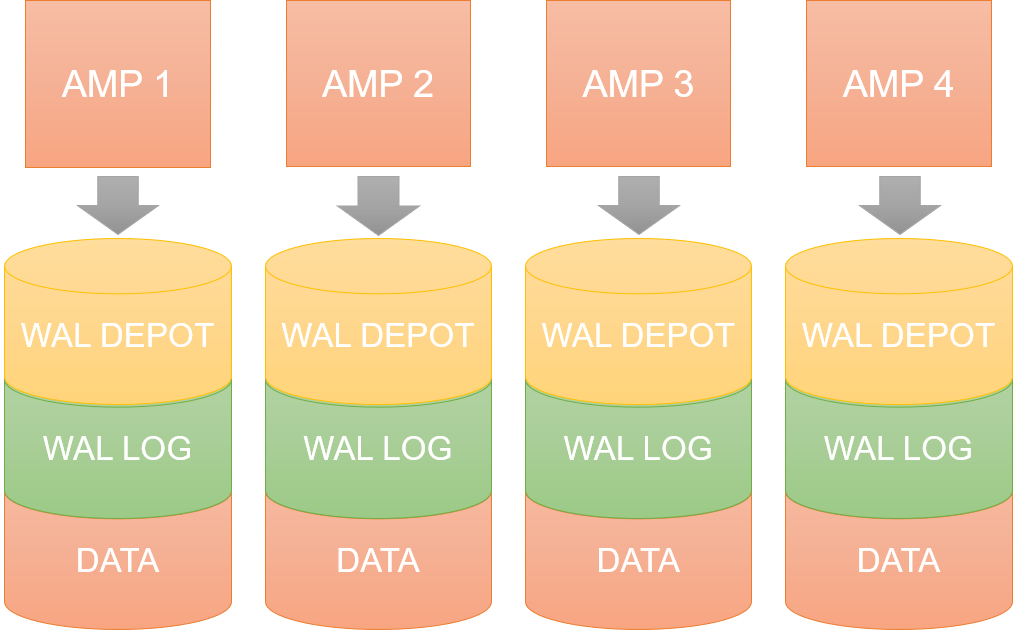
A copy is written into the WAL depot to prevent a complete loss of the data block.
A complete loss could happen if the system fails while writing the data block. The block in the main memory is lost, but the block on the disk could be corrupted.
The copy in WAL Depot is unnecessary if the data block’s size changes because it will be written to another place on the disk.
How does Teradata WAL affect performance?
Since Teradata can execute several transactions on the same data block in memory, performance is improved because fewer IOs have to be executed.
The possible copy in the WAL repository is an additional IO but is necessary if an existing data block is overwritten.
The copies written to the WAL Log before and after a row are changed are single-row writes and, therefore, much more efficient than writing a data block.
Overall, WAL has a positive effect on performance. The additional IO into the WAL depot cannot be prevented, but collecting changes in the main memory reduces the number of IOs.
Where are the Teradata WAL Depot and the WAL Log stored?
The WAL Depot is a fixed number of cylinders on each AMP if several possible blocks are written simultaneously.
The WAL Log requires a dynamic number of cylinders on each AMP.
All of this sits on top of the shared-nothing architecture Teradata is built on.
Identity Columns and Their Limits
Teradata Identity Columns and CREATE TABLE AS
Facing hurdles with the Teradata Identity columns and Volatile Tables? Buckle up because we’re about to overcome this challenge. Despite the inherent limitation, there’s a clever workaround that lets you leverage the ‘CREATE TABLE AS’ statement to generate Volatile Tables, even with Identity columns. So, stick around as we unpack this ingenious solution together!
The Test Setup
Let’s dive in and start with our experimental setup. This will provide a firm groundwork for understanding the solution:
CREATE MULTISET TABLE DB.IDENTITY_TABLE (
      PK INTEGER GENERATED BY DEFAULT AS IDENTITY
         (START WITH 1
          INCREMENT BY 1
          MAXVALUE 1000000
      ),
      VAL INTEGER) PRIMARY INDEX (PK);
INSERT INTO DB.IDENTITY_TABLE (PK,VAL) VALUES (NULL,1);To begin, we’ll establish a basic test table with an Identity column and insert a single row. This minimal setup will perfectly demonstrate our workaround when it comes to employing the ‘CREATE TABLE AS’ statement in conjunction with an Identity column.
If we proceed to replicate this table utilizing the ‘CREATE TABLE AS’ statement, we’re met with an error:
CREATE VOLATILE TABLE COPY_OF_IDENTITY_TABLE
AS
(
                SELECT PK,VAL
                FROM DB.IDENTITY_TABLE
) WITH DATA PRIMARY INDEX (PK) ON COMMIT PRESERVE ROWS;
CREATE TABLE Failed. [5788] CREATE TABLE AS currently does not support Identity Columns.Fortunately, a simple yet effective workaround to this issue is to conceal the Identity column by enveloping the logic within a subquery. The following example illustrates this approach:
CREATE VOLATILE TABLE COPY_OF_IDENTITY_TABLE
AS
(
    SELECT PK,VAL FROM (
    SELECT PK,VAL
    FROM DB.IDENTITY_TABLE
    ) t01
) WITH DATA PRIMARY INDEX (PK) ON COMMIT PRESERVE ROWS;
CREATE TABLE completed. 0 rows processed. Elapsed Time = 00:00:01The derived-table CTAS workaround executed and copied the values. It does not imply that identity-generation attributes were copied; inspect the target definition and explicitly define identity behavior when required.
Should you have concerns that this workaround might introduce performance overhead, rest assured there is absolutely no disparity in the execution plan. Thanks to the intelligence of the Optimizer, it recognizes that the subquery can be optimized effectively. To illustrate this, let’s compare the execution plans of both queries. As you will observe, they are identical, affirming that the workaround is efficient:
Execution Plan of the Original Query
EXPLAIN
SELECT PK,VAL FROM DB.IDENTITY_TABLE;
 1) First, we lock DB.IDENTITY_TABLE in TD_MAP1 for read on a
     reserved RowHash to prevent global deadlock.
 2) Next, we lock DB.IDENTITY_TABLE in TD_MAP1 for read.
 3) We do an all-AMPs RETRIEVE step in TD_MAP1 from
     DB.IDENTITY_TABLE by way of an all-rows scan with no  residual conditions into Spool 1 (group_amps), which is built  locally on the AMPs.  The size of Spool 1 is estimated with low     confidence to be 216 rows (6,264 bytes).  The estimated time for this step is 0.02 seconds.
  -> The contents of Spool 1 are sent back to the user as the result of statement 1.  The total estimated time is 0.02 seconds.
Execution Plan of the Modified Query
EXPLAIN
SELECT PK,VAL FROM (SELECT PK,VAL  FROM DB.IDENTITY_TABLE  ) t01
1) First, we lock DB.IDENTITY_TABLE in TD_MAP1 for read on a
     reserved RowHash to prevent global deadlock.
2) Next, we lock DB.IDENTITY_TABLE in TD_MAP1 for read.
3) We do an all-AMPs RETRIEVE step in TD_MAP1 from
     DB.IDENTITY_TABLE by way of an all-rows scan with no  residual conditions into Spool 1 (group_amps), which is built  locally on the AMPs.  The size of Spool 1 is estimated with low     confidence to be 216 rows (6,264 bytes).  The estimated time for this step is 0.02 seconds.
  -> The contents of Spool 1 are sent back to the user as the result of statement 1.  The total estimated time is 0.02 seconds.
Conclusion
In conclusion, the challenge of creating Volatile Tables from tables with Identity columns in Teradata may seem daunting, but as we’ve explored, it’s far from insurmountable. With ingenuity, we’ve successfully utilized a simple subquery to hide the Identity column, effectively allowing us to use the ‘CREATE TABLE AS’ statement.
Moreover, we’ve dispelled any concerns regarding potential performance overhead. By comparing the execution plans of our original and modified queries, we found them to be identical, proving the efficiency of our workaround.
So, the next time you encounter this common Teradata hurdle, remember this clever strategy. It’s another example of how creativity can help us navigate and overcome even the most complex technical challenges. Happy querying!
For more insights on Identity columns, refer to the following article:
https://dbmstutorials.com/random_teradata/teradata-identity-column.html
Secure Zones

Teradata Secure Zones
I’ve had a few conversations recently with different customers about the “Secure Zones” optional feature added in Teradata 15.10. There is a fair amount of misunderstanding about what this feature offers and does.
This article aims to provide some clear information for anyone considering using this feature.
Before I cover that, let me describe the basic setup of Secure Zones on a Teradata system and what they offer different from previously available.
The Basics
A “Secure Zone” on a Teradata system typically contains multiple databases and users under a single database or user (referred to as the ‘root’ of that zone). The users defined in a zone can only access data in tables/views set in that zone.
A Teradata system has multiple “secure zones”, perhaps named ‘UK’ and ‘EU,’ then users in the ‘UK’ zone cannot see data in the ‘EU’ zone and vice versa. All of this could be achieved entirely simply using standard Teradata Access Rights.
The difference that “Secure Zones” provides is that users in the UK’ zone don’t know that the ‘EU’ zone objects even exist – even if they run a query such as:
SELECT databasename,tablename,tablekind
FROM DBC.Tablesv
WHERE databasename <> ‘DBC’
ORDER BY 1,2;
In a “Secure Zones” environment, this query will not return any objects defined in the ‘EU’ zone – the’ UK’ user doesn’t even know the ‘EU’ zone or its objects exist.
The above ‘works’ because when the query is sent to the Teradata system, the SQL is effectively changed to view DBC.TablesV_SZ (and not DBC.TablesV as coded). It is this view that uses the new table DBC.Zones to filter the returned data.
There are two things to note about this mechanism:
- This change to the SQL only happens for non-DBC users. If user DBC runs the above query, then the SQL is not modified, and rows are returned from all zones.
- This switch to SQL only happens if it references the views (e.g., DBC.TablesV). If the SQL references the underlying tables (e.g., DBC.Dbase, DBC.TVM, etc.), no changes to the SQL are made, and rows for objects in all zones will be returned – regardless of which zone the user running this SQL is defined in.
Possible Use Case
A commonly quoted use case for the “Secure Zones” feature is where a multi-national organization needs to separate data for its different country organizations. This separation may be for regulatory requirements.
In this scenario, each country may have a separate secure zone containing databases, tables, users, etc. The data and users within each zone are specific to a country.
Assume an ‘Orders’ table exists in each zone, possibly with the exact definition. The ‘Orders’ table in each zone is a different physical table – because they are in different databases.
Therefore, if there is a requirement to produce a ‘corporate-level’ Orders report spanning multiple countries (i.e., zones), the SQL has to reference various tables. Yes, that element may be hidden inside a view, but the underlying processing still requires access to various tables. Whether those tables are joined or UNION’d together is a different question and relies on the business requirement. Either solution will likely provide slower performance than all of the data in a single physical table.
Alternative Strategies
Similar data segregation (from different countries) can be achieved without using “Secure Zones,” different approaches have advantages and disadvantages.
- Use different databases and user hierarchies for each country: This is the closest to the “Secure Zones” feature in that the data is separated into different physical tables. Access Rights can be granted such that only the appropriate users can access the data, and corporate-level reporting requires access to multiple tables. The significant difference with this approach is that a ‘UK’ user who runs the query shown above will see that the ‘EU’ objects exist.
- Row-Level Security: With this method, only one corporate-wide Orders table (as an example) contains the data for all countries. Additional ‘row level constraint’ column(s) are added to the table definition, which causes the correct data to be returned to each user based on their access constraints (i.e., country). Corporate-level reporting now only has to access a single table.
- Country-Specific Views: Historically, in Teradata, this has been a widespread solution to this type of requirement. The ‘Orders’ data is stored in a single physical table. A series of ‘country-specific’ views are defined, each with an appropriate WHERE clause such that only data for a particular country is returned. A user is given access to a consistent view of their country.
- Security Table: Alternatively, a single view joins a ‘security table’ that identifies which country the user should see data.
Whether any alternate strategies provide sufficient data security for an organization is a separate question and the only one the organization can answer.
Data Encryption
Secure Zones isolate visibility and access; enabling a zone does not itself encrypt data. Encryption at rest and in transit depends on the configured platform features and key management, and does not universally require a third-party partner.
Performance
The “Secure Zones” feature is not expected to enhance ETL or query processing performance. As stated above, it is possible for some processing (i.e., corporate-level reporting) to suffer in this environment.
Query Logging
These rules are unique to the user’s zone (assuming it is not DBC), executing the BEGIN / REPLACE QUERY LOGGING command.
Workload Management
Because all zones are on the same physical Teradata platform, they are all subject to the same set of rules. (I think this is one area where future versions of the Teradata DBMS software will change).
Summary
In my opinion (and it is just that), the “Secure Zones” feature is aimed at an organization that wants to offer customers a ‘cloud bureaux service’ so that those customers can take advantage of the Teradata features without having to invest in their system. Such customers will end up sharing a physical Teradata system with other independent organizations without being aware.
Please don’t get me wrong; the above requirement is not ‘bad’. It is just (in my opinion) particular, and I don’t think many organizations will have a real need for it.
Teradata in the Cloud
Add Snowflake, BigQuery, and Redshift to your Knowledge
As a passionate Teradata expert, I have fine-tuned thousands of SQL queries throughout my professional journey. It was an enjoyable and fulfilling experience to witness how, with expertise, query runtimes could be optimized from hours to mere minutes or seconds. While end-users were pleased with the results, it was challenging to quantify the cost savings resulting from such significant accomplishments.
If you know Teradata, learning Redshift, Snowflake, BigQuery, etc. is ridiculously easy.
We are currently in the era of cloud computing, with the data warehousing market being dominated by the three major players: Google, Amazon, and Microsoft. The exciting narrative of “No more performance issues, just scalability” is somewhat accurate. The marketing was also truthful: “We require no tuning, indexes, or additional components. We scale, and that’s it.”
Is everything too good to be true? I would say yes — if finances are not a concern, then it may be plausible.
Using Snowflake as an example, I admire its remarkable attributes, primarily its zero-copy cloning ability.
Disillusionment arises due to costs. Need faster query results? Scale up and pay. Want greater concurrency? Create a new warehouse and pay for it.
Conventional tuning methods like clustering or partitioning and search optimization services (referred to as indexes in Snowflake marketing) are once again pertinent. Notably, the latter has an extra charge, similar to the current pricing methods employed by car manufacturers that provide monthly rentals for parking heater functionalities.
As a performance tuner, it is clear that new opportunities are emerging regardless of personal opinions. For instance, reducing the query runtime from 30 to 1 minute can save a company a significant amount if Snowflake charges per minute.
I will continue supporting Teradata throughout my career while prioritizing other technologies such as Snowflake, Redshift, and BigQuery. These alternatives present profitable opportunities in the current market, and I am eager to take on migration and optimization projects.
A Warning About the 16.20 Upgrade
There are some important considerations to keep in mind when upgrading to Teradata 16.20.
After upgrading to Teradata 16.20, we noticed that certain reporting queries produced inconsistent result sets upon each execution. Occasionally, the results were accurate, while at other times they were inaccurate.
This is a historical report of inconsistent results after a 16.20 upgrade, without a verified affected/fixed patch range. It does not justify blanket IPE disablement. Reproduce the exact query and release, retain evidence and consult the vendor’s fix information.
Ever since disabling this feature, my result sets have been consistently accurate. To ensure this remains the case until a resolution is found, I am implementing the following query band as a pre-SQL step on every Microstrategy report.
SET QUERY_BAND = ‘DynamicPlan=OFF;’ FOR SESSION;This information could be helpful to those encountering this issue.
Teradata virtual machine: Moving Between Hypervisors
The Teradata virtual machine is a great opportunity to experiment with a fully functional Teradata system. It can be downloaded from https://downloads.teradata.com/download/database.
Unfortunately, only VMware is supported as the virtualization software. As a user of Oracle’s VirtualBox, I looked for a way to convert VMware images into VirtualBox images.
After unpacking the zip file containing the Teradata virtual machine 14.10, you will find the three files needed by VMware:
sda.vmdk, PDISK0.vmdk and PDISK1.vmdk
Changing the file format from VMware to VirtualBox is relatively straightforward. The conversion process was tested with VirtualBox 4.3.10.
Follow these steps:
– Open a Windows shell (run the cmd command)
– Change the current directory to where your VirtualBox software is installed. In my case, this is:
cd /d "C:\Program Files\Oracle\VirtualBox"
Run the conversion program from your VirtualBox installation. Be sure to convert both the Linux installation and the two virtual disks (VDISKs). The {PATH} variable must point to the directory where the Teradata virtual machine files were extracted.
VBoxManage clonemedium disk "C:\path\sda.vmdk" "C:\path\sda.vdi" --format VDI
VBoxManage clonemedium disk "C:\path\PDISK0.vmdk" "C:\path\PDISK0.vdi" --format VDI
VBoxManage clonemedium disk "C:\path\PDISK1.vmdk" "C:\path\PDISK1.vdi" --format VDI
These commands generate VirtualBox images that can be added directly to VirtualBox. Note that the converted images are significantly larger than the original VMware images. In my case, the original files were roughly 11 GB; after conversion, they totaled over 31 GB.
After this conversion, I successfully installed Teradata virtual machine 14.10 on VirtualBox.
Please don’t hesitate to ask if you have any questions about the conversion and installation process.
Two component-level views sit underneath all of this: a walk through the parts of a Teradata system and what sparse maps change about data distribution.
Four mechanisms underneath this are covered on their own: what the transient journal writes during a transaction, the lock levels and what each one blocks, a short tour of the architecture and the limits of identity columns in practice.
Four component-level articles: what the AMP, PE and BYNET each do, what sits inside a single node, reading object storage with NOS and how map-reduce compares with a parallel database.
Three further system-level subjects: the access paths available to the optimizer, what fallback protection costs and buys and how the pieces of a system fit together.
Articles in this guide
- A Brief History of Parallel Database Architectures and Their Limitations
- Designing Small Reference Tables for Teradata: Storing All Rows on One AMP for More Efficient Queries
- Hot Standby Nodes: The Secret to Seamless Performance and Recovery
- Maximizing Performance with Teradata Sparse Maps: An Introduction
- Optimizing Teradata Requests with Group-AMP Operations for Improved Performance
- Teradata Architecture: How Shared-Nothing Parallelism Works
- Teradata Architecture: The Pioneer of Data Warehousing
- Teradata Data Access: Single-AMP vs. All-AMP Binary Search and Sequential Search
- Teradata DATABLOCKSIZE: How to Minimize Disk I/Os and Optimize Workload Requirements
- Teradata Data Loss Protection: Transient Journal, Fallback, RAID 1, and Clique
- Teradata Dynamic Workload Management Features: What You Need to Know
- Teradata Integrated Workload Management: Features, Classification Criteria, Filters, Throttles, and Workload Priorities
- Teradata Locking Logger: How to Enable and Analyze Lock Activity
- Teradata Permanent Journaling: Snapshot Your Tables Before and After Changes
- Teradata Physical Storage: Exploring Data Blocks and Storage Demographics
- Teradata Physical Storage: Understanding the Technical Details for Performance Optimization
- Teradata Priority Scheduler and Resource Allocation Rules
- Teradata Spool Space 101: Understanding, Managing, and Troubleshooting
- Teradata Tactical Workload
- Teradata Transient Journal: How It Protects Transactions Against Failures and Deadlocks
- Teradata Utility Workload Management: Overview and Protocols
- Teradata VantageCloud Lake: Architecture and Use Cases
- The Teradata AMP Worker Task
- The Teradata MAPS Architecture – Great Performance with All Rows on One AMP
- Throttles in Teradata Workload Management: Usage, Request and Session Limits
- Understanding Deadlocks in Teradata: Prevention and Handling Strategies
- Understanding Teradata AMPs and their tasks in a Teradata system
- Understanding Teradata Express Requests and How They Work with AMPs
- Understanding Teradata Flow Control Mode for Efficient Workflow Management
- Understanding Teradata Locking: Types and Granularity
- Understanding Teradata Nodes in Parallel Systems: Architecture and Scalability
- Understanding Teradata Parsing Engine and Access Rights: Impact on System Performance
- Understanding Teradata Workload: Definition, Advantages, and Characteristics
- Using Sparse Maps in Teradata 16.10 for Efficient Distribution of Small Tables Across AMPs
- What Is Teradata? Architecture, Strengths and Use Cases
- “Explore Teradata’s Shared Nothing Architecture with Our Video Course”
Need help with query performance or platform costs?
Diagnose plans, skew, spool pressure and expensive workloads. Agree a baseline and acceptance criteria before making changes.
Get the complete Teradata tuning book, free
Teradata Query Performance Tuning: The DWHPro Guide
By Roland Wenzlofsky & Artemios Vogiatzis
206 pages on statistics and demographics, access paths and indexes, query execution plans, and joins. Get the full PDF and practical Teradata updates from DWHPro.
Confirm your email to receive your download link. Privacy policy. Unsubscribe in any newsletter.
About the free book